Posts Tagged ‘Renovation’

House Buying Advice – My Propertytoolbox Top Five

The Propertytoolbox Blog has been full of great stuff this year. I have my own personal favourites and I thought I would share them with you. These articles were ones that I thought had some really helpful and useful information – giving you some key knowledge that could help you to make good house buying decisions! And that is, after all, what we are all about here at Propertytoolbox.

My Propertytoolbox Top Five

1. Scrim and Sarking.

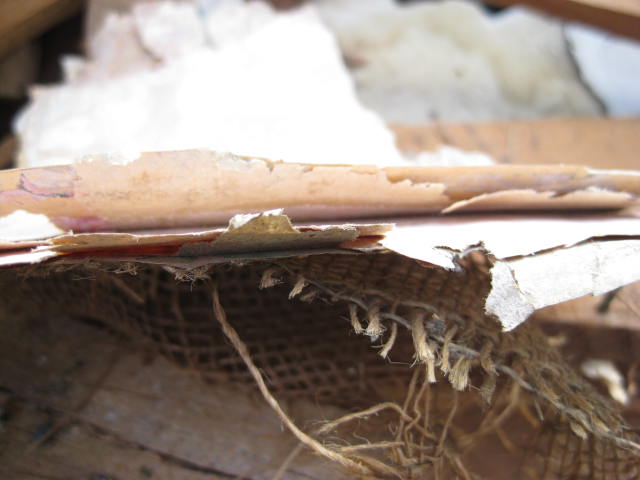
This 4 part series of articles was packed full of information on Scrim and Sarking (a common wall lining in NZ houses). We started with explaining what Scrim and Sarking is and how to identify it. Then we went on to discuss why you need to think about replacing Scrim & Sarking wall linings. This article was followed by one on re-gibbing and what that involves and then finally on to the cost of replacing Scrim and Sarking wall linings. The series had some fantastic photos too, this was my favourite photo of the year.

Layers Of Wallpaper On Scrim

2. The OCR

The OCR (Official Cash Rate) is an important part of your life when you have a mortgage – and it really helps to understand what it is about when you are deciding about fixing or floating your home loan. Our article ‘The OCR and Your Home Loan Interest Rate’ talks all about it – so have a read and maybe the OCR will not longer be a mystery!

3. Viewing a House – 10 Quick Checks

The advice in this article could save you a lot of time and energy! In it we list 10 quick visual checks you can do when you go to view a house. These few checks can give you some insight into things that you may have missed otherwise and may only come to light at future viewing or even in a building inspection as part of an offer.

4. Costs of Home Ownership

Sometimes only the full impact of the financial commitment of home ownership becomes clear when it is too late. This explains all, and may highlight things/costs you haven’t even thought of. It always pays to make any house buying decision fully informed so this article ‘House Maintenance Budget? Costs of Home Ownership’ is a must read.

5. Property Valuation

So you want a property valuer? How about a website that profiles your local property valuers allowing you to compare, choose and contact them? Propertyvaluationnz.co.nz does all that! Propertyvaluationnz.co.nz was launched by Propertytoolbox this year and I think it provides an awesome service for home buyers in NZ – find out more about it in the Blog article ‘Property Valuation NZ – Helping You Find a Property Valuer’.

So there you have my top five. Over the next few weeks we will be going over more of our ‘Best Bits’ from the Propertytoolbox Blog for this year. Do you want more great house buying information right now? Head straight to our house buying guide.

Replacing Scrim With GIB – What Does It Cost To Re-GIB?

In previous post we discussed what Scrim and Sarking is and why it should be replaced. Then we talked about just what re-GIBing is. Now we are getting down to it – the money...

What is it Going to Cost to Re-GIB – The Basics

For a straightforward room (a small double room with not too many fiddly bits!) the cost of re-lining with plasterboard (re-GIBing) depends mostly on the wall area that is being covered. It can cost upwards from $800 - $1,000 per room to get the room to a state that it is ready for painting i.e. Plasterboard put up and plastering of the joins to give a smooth finish (GIB Stopping). This price would be for a DIY job with a GIB-stopper hired in. A big factor is whether you do it yourself or hire in the professionals – this will add a lot more to the cost - and if this is the way you are going - get a few quotes.


The type of plasterboard or GIB you use can impact on the cost – GIB Standard® is the most inexpensive – if you use GIB Aqualine® in wet areas such as kitchens, bathrooms and laundry’s or GIB Noiseline® where you want noise reduction then the will cost a bit more. To find out more about the GIB products check out their website.

What is it Going to Cost to Re-GIB – Wait! There’s More!

How you prepare the room for re-GIBing can impact hugely on the cost – are you going to strip all the Scrim and Sarking off? Or just strip off the Scrim and screw Plasterboard to the old Sarking board?

Replacing Sarking with GIB - Cost to Re-GIB - Removing Sarking Boards

Removing The Sarking Boards - Some Dry Rot Exposed

Commonly the Sarking board provides a horizontal bracing element for the house – i.e. there are no Dwangs behind Scrim & Sarking walls – you will need to replace this bracing element if you remove the Scrim & Sarking completely. This is now a structural issue – don’t ignore it! It important to address properly and may involve putting in new Dwangs and/or even using a product such as GIB Braceline®.

Replacing Sarking with GIB - Cost to Re-GIB - Wall Structure After Scrim and Sarking Removed

Wall Structure Once Scrim & Sarking Removed - No Dwangs

If you do remove the Scrim and Sarking completely you never know what you are going to find. Often you find relic’s from a bygone era in the form of old coins, bottles and cutlery, but less fun is finding rot – which will need to be repaired, and the source of the rot identified and fixed, before you can re-GIB. The costs of this kind of find can add up...

Replacing Sarking with GIB - Cost to Re-GIB - Dry Rot in Wall Framing

Dry Rot & Borer Exposed

If you are planning on insulating (which is always a great idea!) this adds to the cost, and again, if you choose higher rated insulation or insulation with noise reduction properties the cost will increase.

How do you insulate if you are not removing the Sarking Board? You can take out every third board and feed the insulation in. This keeps the bracing element of the Sarking Board but allows you to insulate the wall cavity. Just remember where the missing boards are when you are screwing the GIB on!


Something that can really impact the cost of re-lining is what you decide to do with the existing covings, architraves and skirting board – can they be kept in place? Removed and reused? Or do they need to be replaced? The majority of re-GIBing situations require coving, skirting board and architraves to be removed.

Sometimes a ‘work-around’ can be arranged if you have intricate moulded covings you want keep. Re-GIBing can be done where the GIB butts up next to architraves and sits on top of skirting boards – but in most cases it is hard to get a good finish with this technique.

So replacing your Scrim and Sarking wall linings is going to take a bit of planning, and probably a bit more money than you thought - so make sure you have the time and the budget to do it properly before you start.

The Propertytoolbox Home Buyers Guide

Want more home buying info and advice? Head to our home buyers guide. With advice on all aspects of the home buying process - all you need is here.


Replacing Scrim With GIB – What Is Re-GIBing?

Last week we discussed just what Scrim & Sarking is and how to identify it. Then we talked about why GIB should be replaced. Now, before we move on to the cost of re-GIBing, we are discussing just what re-GIBing is...

What Is Relining? Or Re-GIBing?

Relining or Re-GIB is when Scrim (or any other inferior wall lining) is replaced with plasterboard. In NZ Plasterboard is commonly referred to as GIB – this is the brand name for the most commonly sold form of plasterboard. GIB has been around for a long time and is considered an iconic NZ brand.

What is GIB or Plasterboard?

Plasterboard is a rigid board which is made by casting gypsum plaster and coating with paper. All plasterboard resists fire and is the most commonly used wall board product in new builds. Current building regulations require certain specifications for wall board and fire ratings for all walls. Modern plasterboard is designed to meet these requirements.

re-GIBing - replacing scrim with GIB

Scrim and Sarking Removed - New GIB On

Once new plasterboard has been put up the final part of the re-GIBing process is GIB-stopping. GIB stopping is where the joins between the GIB sheets are plastered to give a seamless finish. While working out how to put up GIB just takes a bit of research, the right tools, planning and some muscle – GIB-stopping is a bit of an art! It pays to hire in some highly recommended GIB stopping talent for this bit.

GIB is made by Winstone Wallboards. On their website they have all the resources you need to find out about GIB and how to install it.

Re-GIBing – It’s Just a Small Part of Renovation

Re-Gibing it not just about putting up some plasterboard – it is an opportunity to sort out a lot of things in a room, when you strip off the old Scrim &/or Sarking Board you are going to get a window of opportunity to access difficult areas and usually inaccessible components of your house.

This is a great opportunity to insulate! Insulating exterior walls is a must, but even insulating interior walls with normal or sound proof insulation can improve your enjoyment of your home, keeping it warmer and quieter!

re-GIBing - replacing scrim with GIB

New Insulation & New Wiring Including CAT5

You can take the opportunity to replace old wiring in a room you are re-GIBing and even put in more plugs, light fittings and switches. What about wiring for speakers etc? And have you considered smart wiring (CAT 5)?

Next Post - Re-GIBing Scrim - What is it going to cost to re-GIB

The Propertytoolbox Home Buyers Guide

Want to find out more about how to identify problems with a house before you buy it? Check out our guide to building inspectors – or for a quick do it yourself read our house inspection tips.


Replacing Scrim With GIB – Why Should I Do It?

Last blog post we discussed just what Scrim and Sarking was and how to identify it. This week we are discussing why it should be replaced. If you want to skip right to the practicalities check out our posts on - what is re-GIBing and what will it cost to re-GIB.


What’s Wrong With Scrim and Sarking?

Scrim and Sarking is a fire hazard – is it dry and brittle – having been aging and drying within your house for nearly 100 years. Combined with aged wiring, the risk of fire, and risk or significant damage from a fire, is much higher than that of a modern home.

Scrim wall linings are also very unsuitable for the purposes of redecoration. When scrim deteriorates, it comes away from the Sarking leaving an unstable base for painting or wallpapering (particularly in room corners – this is a very tell-tale sign of Scrim).

Why Should I Re-GIB?

Insuring your home can be problematic when you have inferior wall linings. Your insurance company will ask if your house has been relined when you get insurance, they consider Scrim & Sarking wall linings an increased risk factor for damage.

If you have Scrim & Sarking wall linings, especially combined with old wiring your insurance company may not be prepared to offer you their most comprehensive insurance policy.

Replacing Scrim with GIB - Re GIBing - Why should you do it?

Sarking Boards Exposed

Replacing Scrim and Sarking - The Result

Replacing Scrim and Sarking with GIB will give you a stable, fireproof, smooth wall that when GIB Stopped and redecorated (painted or wallpapered) will give you the ability to get a high quality finish. Removing old wall linings before re-GIBing also gives you an opportunity to access and repair the wiring, and insulation a room.

So to ensure you home is safe, to be able to get a comprehensive insurance policy and to get the most benefit out of any renovating and redecorating – removing Scrim and Sarking and re-GIBing is essential.

Next Post - Replacing Scrim with GIB – What is Re-GIBing?

The Propertytoolbox Home Buyers Guide

Still on the house hunt? Check out our house buying guide – we have all sorts of tips and tricks to help you make great house buying decisions.


Replacing Scrim With GIB – What Is Scrim And Sarking?

Re-GIBing Scrim and Sarking is the Propertytoolbox topic for the next 4 blog articles. The articles will cover:

• What Scrim and Sarking is and how to identify it (that's all covered in this article)
why you should consider replacing it
what re-GIBing is
What re-GIBing costs

What is Scrim and Sarking

There are generally three types of wall lining used in New Zealand houses:

• Scrim and Sarking
• Low Density Fibreboard
• Plasterboard – GIB

We are focusing on Scrim & Sarking because this is the most problematic type of wall lining in NZ homes.


What is Scrim and Sarking

Scrim & Sarking – often just called ‘Scrim’ is a hessian or jute sacking material (Scrim) that has been tacked or stapled on to rough sawn, horizontally placed, thin wooden planks (Sarking).

Layers Of Wallpaper On Scrim

Scrim and Sarking forms the 'wall board' - to which wallpaper is then fixed. Over the years a Scrim and Sarking wall may have been covered by many layers of wallpaper and in more recent times painted. Scrim and Sarking was used commonly in houses built in the late 1800’s and the early 1900’s.

Sarking Boards Exposed - Wallpaper Layers & Scrim Partiall Stripped Away

How Do I Know if it is Scrim and Sarking?

If you suspect a house has some Scrim & Sarking wall linings i.e. It falls into the ‘late 1800’s to early 1900’s' age bracket. Here are three tests you can use to work it out:

  • The knock test - Scrim (unsurprisingly) feels like knocking on wood. Scrim is a very hard surface; the knock is hollow sounding, with the sound carrying well. It is impossible to distinguish any studs when knocking along the wall.
  • The floating wallpaper test – Scrim & Sarking is ‘finished’ by covering the Scrim with wallpaper (sometimes the wallpaper has since been painted). With age the hessian Scrim starts coming away from the Sarking and gives the impression of floating, bulging or twisting wallpaper. This is especially obvious in room corners.
  • Close inspection – With close inspection you can sometimes see rough sawn board (Sarking) or hessian (Scrim) where wallpaper is loose or has come away, or the wallpaper will look ‘textured’ as the woven hessian fabric has imprinted the wallpaper from underneath.

Close Examination - Sarking Boards, Scrim & Wallpaper

Using all or a combination of these techniques you should be able to identify Scrim & Sarking.

Next Post - Replacing Scrim with GIB – Re GIBing – Why Should I Do It?

The Propertytoolbox Home Buyers Guide

Do you think the house you are looking to buy has Scrim and Sarking wall linings? Not sure and want to find out more? Maybe a building inspector can help - and make sure to check out our ten key rules before you put in that offer. For more help, tips and tricks when you are on the house hunt, check out our house buying guide.


There is a Problem With the Building Inspection! What Should I Do?

The first thing you need to do when your building inspection identifies a problem is to work out how serious the problem is – a good person to question initially is the person who did your building inspection – you need to make sure that you fully understand the problem that they have identified.

Building Inspection Problem? Get a Specialist Building Advice

A building inspector is not an expert in all aspects of building so if a particular problem has been identified and the building inspector has indicated that they cannot tell you the extent of the problem or the cost to fix - it is best to speak to, or get quotes from, an expert in the area.


Say the piles are a problem – speak to a replier – they will be able to assess the extent of the problem and give you a quote for the remedial work.

Now you are in a position to start making decisions depending on your situation...

I Have a Signed Sale and Purchase Agreement

You may have gotten the building inspection as part of working through the conditions on a sale and purchase agreement. If you are not happy with the building inspection:

  • You are now legally entitled to cancel the agreement. To do this you tell your lawyer, and usually the real estate agent that you are not going unconditional based on an unsatisfactory building inspection. This can be a very hard decision to make as by this stage you have invested time, money, and emotion in the house, but in many cases it is the best decision.
  • You can re-negotiation the price of the house with the vendor. Go into negotiations with quotes for remedial work in hand – and bargain hard! Don't forget, it always pays to budget for some extras!
  • You can ask the vendor to fix what is wrong before you buy the house. Especially if the problem is fairly easy to fix i.e. a few hours work by a plumber or electrician this is often a good solution. If the problem is major – the vendor will rarely agree to fix it.
  • You may still be happy to proceed with purchasing the house at the agreed price - and you still can. Perhaps none of what was identified in the building inspection is a surprise, or you now know why the house was a reasonable price from the beginning! Before proceeding double check your numbers, make sure you are happy with the amount you are going to have to pay in repairs and renovation, and add a contingency of at least 10%.

If you and the vendor come to an agreement that involves the vendor having to complete work, or the price changes, or anything else at all, this needs to be formalised in the sale and purchase agreement by your lawyer.

Even if the work agreed is small (i.e. rubbish removal or repairing flashing) and seems insignificant to include – the reality is that it will not be done unless the vendor commits to it via the sale and purchase agreement.

I Haven’t Started Price Negotiations

If you have obtained this building inspection before even beginning negotiations on a house that you are interested in you have similar options:

  • You can walk away – the house is not suitable anymore – move on!
  • You can start price negotiations fully armed with exactly what is going on with the house. This is a much stronger bargaining position then if a price had already been agreed and a reduction was being negotiated. It is hard for people to comprehend that seemly overnight their house price has decreased significantly.
  • You can start negotiations from the beginning with a condition that lists things for the vendor to fix before you will settle on the house – again, if the problems are extensive - this can be a very short negotiation!

Sometimes the extent of the remedial work needed to fix a problem identified by a building inspection can not be worked out exactly by a ‘surface only’ examination by a building inspector or tradesman i.e. extent of rot given evidence of rotten weatherboards.

In these situations you will only be able to get an estimate of the cost of fixing – as a lot will depend on the extent of the problem and this will only be known when the remedial work starts.

It is up to you here to make a decision based on how much of a risk you want to take! In these cases, if you are not comfortable with what can potentially be an unknown, and large, expense it is best to walk away.

Building Inspection Problem - What To Do
|

The Propertytoolbox Home Buyers Guide

The information you have just read about building inspection problems has been added to the Propertytoolbox house buying guide - An essential resource for house buyers in New Zealand. Find out more about house buying in New Zealand here.


Does The House Need Repiling? Repiling NZ Style…

What are Piles?

Piles are wooden or concrete posts under a house that form the foundations and are what many New Zealand houses sit on. The job of the piles is to distribute the weight of the house evenly across the soil underneath, and the house construction distributes the house weight as evenly as possible over the piles, ensuring the house stands straight and square.


Over time piles can rot away, causing them to fail, uneven distribution of house weight over piles can cause uneven settling, or movement of the ground under and around piles can cause piles to move.

Repiling a house NZ Style - Not a Firm Foundation

Not a Firm Foundation

Repiling a house NZ Style - 100+ Year Old Totara Piles

100+ Year Old Totara Piles

Has the house been repiled?

If the house was built in an era that used totara piles, an a examination of the piles under the house will soon determine if repiling has happened. New piles are either concrete or tanalised (H5) pine and are easy to spot.


Make sure to check out that all the piles have been replaced. It is quite common to see that only a few piles are new, often these are the piles around the edge of the house.

Why repile?

Sometimes all the piles move, but more often different piles move to different extents. This causes the house to twist, bow, and crack, resulting in damage. The piles may have stopped moving, or may be continuing to move - this all depends on the cause of the movement. To halt ongoing damage, re-piling is necessary. If you are planning renovations, it pays to start with firm foundations or you are going to end up with an inferior result.

About repiling

Repiling involves digging new piles down to a firm base and attempting to re-align the house on this new foundation. Sometimes it is obvious that repiling work is necessary. You may find yourself walking up hill and down around a house! Usually it is a lot more subtle.

To establish if the piles are a problem and to what extent, you will need to ask the experts. A house inspector is a good start. Make sure you get a good idea as to what is caused the need for repiling – it this likely to be an ongoing issue? i.e. poor soil, ongoing subsidence, risk of landslide. Can the cause be fixed? i.e. leaking pipe, drainage issues causing water to run under the house.

Repiling - The process

Repiling is a major job and different repilers repile use different methods - some cut holes in the floor to access under the house and some lift the entire house up. The technique used depends on a variety of factors with access being a big deciding factor and personal preference and tools and equipment available to the repiler having an influence too.

Repiling a house NZ Style - Lifting up the House

Lifting up the house

Repiling a house NZ Style - Cutting the Floor to Place House Raising Jacks

Cutting up the floor to place jacks

I am repiling - What else can I do?

Repiling opens a lot of opportunities to do other things to a house, it can be moved, lifted up and another level added underneath, or shifted somewhere else completely! The access that is gained under the house is also an opportunity to do things underneath that in usual circumstances are quite difficult - like underfloor insulation and working with the plumbing and electrical systems.

Repiling a house NZ Style - Access Under the House During Repiling

Access under the house during repiling

Repiling a house NZ Style - Moving a house during repiling

This house was moved across 1m during repiling

Repiling requires a building permit - other additions and changes to the house can be added to the same permit so it pays to plan in advance exactly what you want to do with a house before you repile so all your permissions can be gained at the same time - saving money - and also allowing you to organise access under the house for other works while the repiling is happening.

How much for a repile?

If you need to repile get a repiler in for a quote. Re-piling costs vary hugely and depend on many. Repiling costs start at around $12,000 - 15,000 (for a very small house, on the flat with fantastic access) and quickly climb when you start getting into soft soils, erosion problems and difficult access.